Picture changing your room’s look with lights that match your mood. Dimmable LED strip lights can do this! These dimmable LED strip lights save energy and can be adjusted. They are great for setting the perfect vibe in any space. Use them indoors for a cozy feel or outdoors for style. Waterproofing keeps them safe in all weather.
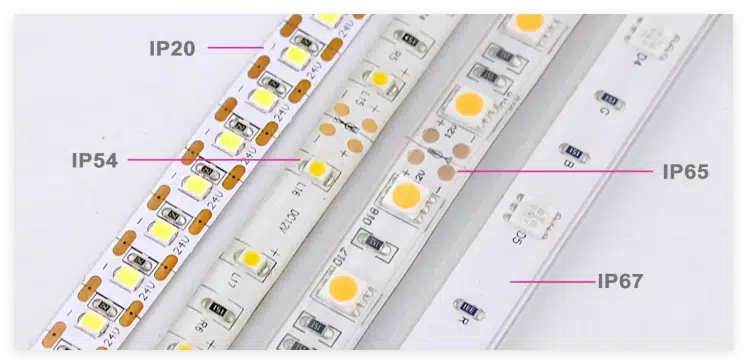
Why is waterproofing important? Here’s a simple guide to IP ratings:
IP65: Works well outside but can’t go underwater.
IP67: Can be underwater for up to 10 minutes.
IP68: Fully waterproof, safe for staying underwater.
It’s no surprise that dimmable LED strip lights are so popular. They are easy to set up, save energy, and look modern. The market is expected to grow from $2 billion in 2025 to $3.8 billion by 2033. These dimmable LED strip lights are clearly here to stay. Ready to begin? This guide will help you every step of the way!
Key Takeaways
Dimmable LED strip lights let you change brightness for any mood.
Pick the right waterproof level (IP65, IP67, IP68) for your location.
Get tools like wire cutters and screwdrivers ready before starting.
Cover connections with silicone and heat-shrink tubes to keep water out.
Follow these steps: choose, measure, prepare, cut, connect, and test for success.
Understanding Dimmable LED Strip Lights
What Makes LED Strip Lights Dimmable?
Ever think about how LED strip lights change brightness? It’s all thanks to smart technology. These lights have special controllers that manage power flow. By adjusting the power, the lights can get brighter or dimmer. It’s like turning a volume knob, but for light!
These lights are great for setting the right mood. Want a soft glow for movies? Or bright light for work? They can do both. Plus, they save energy. Lower brightness uses less power, which cuts down your electricity bill.
Waterproof Ratings and Their Importance
Planning to use LED strips outside or in wet areas? Waterproofing is key. IP ratings show how well lights handle water and dust. Here’s a simple guide:
IP Rating | What It Means | Water Protection |
|---|---|---|
IP65 | Resists water jets from any angle | Not for underwater use |
IP67 | Handles short dips in water (10 minutes) | Not for long submersion |
IP68 | Fully waterproof, safe underwater up to 3 meters | Good for submersion |
For patios, IP65 lights work fine. Near pools or fountains, pick IP68 lights. The right rating keeps your lights safe and lasting longer.
Applications for Waterproof Dimmable LED Strip Lights
You can use these lights almost anywhere. Want to brighten a garden path? They’re perfect. Need kitchen under-cabinet lighting? They work indoors too. Use them for pools, decks, or bathrooms. They’re great for both looks and function.
With dimmable features, you can change brightness for any event. Use bright light for work, then dim it for relaxing. These LED strips are stylish, useful, and energy-saving. They’re a smart pick for any space.
Tools and Materials for Installation
Before setting up your LED strips, gather your tools and materials. Having everything ready makes the process simple and smooth. Let’s go step by step.
Tools You’ll Need
You’ll need some basic tools to get started. These tools help with wiring, securing parts, and fixing problems. Here’s a list:
Wire Stripper: Cuts and removes wire coverings easily.
Screwdrivers: Tighten screws on LED components securely.
Voltage Tester: Checks if wires have power and the right voltage.
Wire Connectors, Electrical Tape, and Heat Shrink: Keep connections safe and secure.
Solder Iron (Optional): Useful for joining LED strips to fit custom sizes.
Having these tools ready makes the setup safer and faster.
Materials: LED Strips, Power Supply, and Extras
Next, gather the materials you’ll need. The right materials make sure your LED strips work well and last long. Here’s what to get:
LED Strips: Pick ones that fit your needs, like indoor or outdoor use. Choose dimmable ones with proper waterproof ratings.
Power Supply: A good power supply is important. Use LED drivers for dimming and better control.
Wiring and Connectors: Insulated wires and connectors make safe, easy-to-remove connections.
Smart Controls: Want phone control? Smart lighting controllers are a great choice.
For more details on LED strips and accessories, check out LED Strip Light Comparisons.
Waterproofing Supplies for Protection
If using LED strips outdoors or in wet places, waterproofing is key. Here’s how to protect them:
Cover open connections with silicone sealant.
Use heat-shrink tubing to make joints stronger.
Follow the maker’s instructions for prepping surfaces and handling moisture.
Test waterproofing by running water over it for 24 hours.
These steps keep your LED strips safe and working, even in tough conditions.
Step-by-Step Guide to Install LED Strip Lights

Step 1: Select the Right LED Strip Lights
Choosing the right LED strip lights is the first step to a successful setup. Start by checking the input voltage your LED strips need—most commonly 12V or 24V. Make sure your power supply matches this requirement and has at least 10% more wattage than the total wattage of your LED strips. This ensures smooth operation without overloading the system.
Next, think about the ambiance you want to create. For a cozy vibe, go for warm white tones around 2700K. If you need bright, task-oriented lighting, cool white at 5000K is a better choice. Also, consider the brightness level. LED strips range from 200 to 800 lumens per meter, so pick one that suits your space. Don’t forget to check the waterproof rating if you’re installing them outdoors or in damp areas.
Finally, look at the length and flexibility of the strips. Measure the area where you’ll install them and choose a length that fits. Common options include 1m, 2m, and 5m strips, but longer ones like 10m are also available for larger spaces.
Step 2: Measure and Plan the Layout
Before you install LED strip lights, take some time to measure and plan. Start by measuring the surface where the strips will go. Include corners, curves, and any obstacles in your calculations. Add up these measurements to determine the total length of LED strips you’ll need.
Think about the layout. Will the strips run in a straight line, or do you need to navigate around corners? If so, you might need connectors or extra strips for proper coverage. Also, plan the placement of the power supply. Make sure it’s close enough to the strips and in a well-ventilated area.
For a professional look, consider the height of the room and the size of the fixtures. Small fixtures work better in compact spaces, while larger ones suit bigger rooms. If you’re using dimmable LED strip lights, plan the location of the dimmer switch for easy access.
Step 3: Prepare the Installation Surface
A clean and smooth surface is key to a successful installation. Start by cleaning and prepping the installation surface. Use a damp cloth or alcohol wipes to remove dust, grease, or debris. Make sure the area is completely dry before proceeding. This step ensures the adhesive backing on the LED strips sticks properly.
Before sticking the strips, test them. Connect them to the power supply and check for consistent brightness. This helps you spot any defects or connectivity issues early. If everything looks good, you’re ready to move on.
For added security, use mounting clips or brackets, especially in areas where the adhesive might not hold well. These provide extra support and keep the strips in place over time.
Step 4: Cut and Seal the LED Strips
Cutting your LED strips to the right size is important. Look for the marked cutting lines on the strip. These lines are spaced every few inches. They help you avoid damaging the strip’s internal parts. Use sharp scissors or a precision cutter for clean cuts.
After cutting, sealing the ends keeps them waterproof. Follow these steps:
Seal the Ends: Add clear silicone sealant to the cut edges. This blocks water from getting inside and ruining the strip.
Use Waterproof Connectors: To join strips, use waterproof connectors. They make a strong, water-safe connection.
Test the Connection: Solder the pieces together and test them. Make sure the lights work well and stay stable.
Pro Tip: Let the silicone dry for 24 hours before using the strips in wet areas.
Step 5: Connect to Power and Dimmer Switch
Next, connect the LED strip to power. Check that your power supply matches the strip’s voltage (like 12V or 24V). Follow these steps for a safe setup:
Attach the Strips to the Power Supply: Use the connectors from your LED kit. Match the positive and negative sides correctly.
Install the Dimmer Switch: If using a dimmer, place it between the power supply and the LED strips. This lets you control the brightness.
Secure the Power Supply: Mount the power supply in a spot with good airflow. This prevents overheating.
For safety, remember these tips:
Add fuses or circuit breakers to stop overcurrent.
Keep low-voltage wires away from high-voltage ones to avoid problems.
Label wires clearly so they’re easy to identify later.
Step 6: Test and Secure the Setup
Before sticking the LED strips, test them to ensure they work. Here’s what to do:
Check Brightness and Color: Turn on the lights. Make sure the brightness and color look right.
Inspect Connections: Watch for flickering or dim spots. These could mean loose connections.
Once everything looks good, stick the strips to the surface. Remove the adhesive backing and press the strips firmly onto the cleaned area. For extra hold, use mounting clips or brackets. These are helpful in places with movement or moisture.
Finally, check the setup’s durability. Gently pull on the strips and connections to ensure they’re secure. This helps your setup last longer.
Waterproofing and Safety Tips

How to Seal Connections Properly
Sealing connections is very important when setting up LED lights. This is especially true in places with water or moisture. Water and electricity can be dangerous together, so being careful is key.
Here’s how to seal connections the right way:
Use waterproof connectors to join LED strips. These keep water out.
Add silicone sealant to open areas, like cut edges or extensions. This gives extra protection from water.
Check all connections to make sure they are sealed well. A good seal helps your lights last longer and stay safe.
For outdoor use, pick LED strips with the correct IP rating. In wet places, IP68-rated strips work best.
Using Silicone and Heat-Shrink Tubing
Silicone and heat-shrink tubing are great for keeping LED lights waterproof. Silicone seals open spots, and heat-shrink tubing protects joints from water damage.
Here’s how to use them:
Put silicone sealant on open connections and cut edges. Let it dry for 24 hours before getting the strips wet.
Slide heat-shrink tubing over joints before connecting strips. After connecting, use a heat gun to shrink the tubing. This makes a tight seal that blocks water.
These tools are simple to use and give strong protection. They are perfect for outdoor setups where weather can change quickly.
Safety Guidelines for Outdoor Installations
Outdoor setups need extra care to stay safe and last long. Follow these tips to avoid problems:
Match the power supply to the LED strip’s voltage. This stops overheating and damage.
Buy LED strips and parts from trusted sellers. Good quality lowers the chance of problems.
Place the power supply in a spot with good airflow. Keep it away from things that can catch fire.
Test outdoor controls to make sure they are safe. Some buildings may need a safety certificate for approval.
Millions of LED strips have been sold without fires when installed properly. By following these steps, you can have a safe and beautiful outdoor lighting setup.
Troubleshooting During Installation
Fixing Flickering or Non-Dimmable Lights
Flickering or non-dimmable LED lights can be annoying, but they’re usually easy to fix. First, check the power supply. If it doesn’t match the LED strip’s voltage or wattage, the lights might flicker or not dim. Use a voltage tester to ensure the power supply gives steady energy.
Here are common problems and fixes:
Power Supply Issues: Make sure the power supply fits the LED strip’s needs. If it’s broken or old, replace it with a new one.
Loose Wires: Look for loose or dirty wires. Tighten or clean them carefully.
Faulty Hardware: Test with another power supply to check for hardware problems.
Case Study: An office fixed flickering by replacing old drivers that gave unstable power. A homeowner solved dimming by upgrading their power supply setup.
Addressing Uneven Brightness
Uneven brightness can make your LED strips look bad. This often happens due to voltage drops or bad electrical contact. Start by checking the voltage along the strip. If it drops a lot, you’ll need to adjust the setup.
Here’s how to fix it:
Clean Contacts: Remove dirt or rust from contacts. Dirty contacts increase resistance and lower brightness.
Check Voltage Drops: Use a multimeter to measure voltage at different points. If brightness fades at the end, split the strip and add more power supplies.
Match Voltage: Ensure the power supply gives the correct voltage to the LED strips. Wrong voltage causes brightness problems.
Pro Tip: For long strips, use amplifiers or extra power supplies to keep brightness even.
Resolving Connectivity Issues
Connectivity problems can stop your LED strips from working. Loose connections or wrong dimmers are common causes. Here’s a quick guide to common problems and solutions:
Problem | Cause | Fix |
|---|---|---|
Lights stopped working. | Loose dimmer or wrong dimmer used. | Check connections and use a compatible dimmer. |
Lights won’t turn on. | Not plugged in, loose wires, or dead batteries. | Check plugs, tighten wires, or replace batteries. |
Flickering lights. | Bad power supply or weak controller battery. | Match voltage or replace the controller battery. |
Color changes at the strip’s end. | Voltage drop. | Split strips and add more power supplies. |
Pins not working. | Pins inserted incorrectly. | Reconnect pins carefully to avoid damage. |
Wrong power source. | Incorrect voltage used. | Use the correct voltage (12V or 24V) for the LED strips. |
Real-Life Example: A homeowner extended RGB LED strips on their ceiling and kept colors even by using good connectors and amplifiers. A store fixed voltage drops by placing power supplies along display shelves.
By following these steps, you can quickly solve most installation problems. Take your time and pay attention to details for a perfect lighting setup.
Installing waterproof dimmable LED strip lights doesn’t have to be complicated. Let’s quickly recap the steps:
Choose the right LED strips based on your needs.
Measure, plan, and prepare the surface for installation.
Cut, seal, and connect the strips to power and a dimmer switch.
Test everything and secure the setup for long-lasting results.
Tip: Take your time with each step. A little patience goes a long way in creating a flawless lighting setup!
Now it’s your turn to enjoy the magic of customized lighting. Whether it’s a cozy indoor glow or a vibrant outdoor display, your space will shine like never before. Have questions or want to share your experience? Drop a comment below—we’d love to hear from you! 😊
FAQ
What is the best way to clean waterproof LED strip lights?
To clean them, use a soft, damp cloth. Avoid harsh chemicals or abrasive materials that could damage the waterproof coating. If they’re installed outdoors, gently wipe away dirt or debris. Always turn off the power before cleaning for safety.
Can I cut waterproof LED strip lights?
Yes, you can cut them, but only at the marked cutting points. Use sharp scissors for a clean cut. After cutting, seal the ends with silicone or heat-shrink tubing to maintain waterproofing. This step ensures the strips stay safe and functional.
How do I control the brightness of dimmable LED strip lights?
You can control brightness using a dimmer switch or a smart controller. Some models even let you adjust brightness through a mobile app. Make sure the dimmer is compatible with your LED strips for smooth operation.
Are waterproof LED strip lights safe for underwater use?
Not all waterproof LED strips are safe underwater. Check the IP rating. For underwater use, choose IP68-rated strips. These are designed to handle full submersion. Always follow the manufacturer’s guidelines to avoid damage or safety risks.
Can I install LED strip lights without professional help?
Absolutely! Installing LED strip lights is a DIY-friendly project. Follow the steps in this guide, and you’ll have them up in no time. Just ensure you have the right tools, materials, and safety precautions for a smooth setup.
Tip: Take your time during installation to avoid mistakes and ensure a professional-looking finish.
See Also
Ultimate Resource for Choosing Outdoor LED Light Strips
Adjustable COB LED Strips for Versatile Lighting Options
Selecting The Perfect LED Strip Lights For Linear Lighting


