Cutting LED strip lights the right way is very important, especially when you need to cut LED strip lights to fit your space. This helps you avoid damage. You will need some tools to begin. Get a sharp pair of scissors or a utility knife. You will also need measuring tape. A soldering iron may be needed if you want to join strips again after you cut LED strip lights. Using the correct techniques makes clean cuts, ensuring that your lights continue to work well.
Key Takeaways
Get the right tools before cutting LED strip lights. Use sharp scissors or a utility knife. You will also need measuring tape. Work on a clean surface to make sure your cuts are neat.
Find the right cut points on the LED strip. Look for marked lines. This helps you avoid hurting the circuitry. It also makes sure the lights work well after cutting.
Always turn off and unplug the LED strip before cutting. This stops electrical shocks. It also keeps the lights safe from damage.
How to Cut LED Strip Lights

Gather Your Tools
Before cutting LED strip lights, get your tools ready. You’ll need:
A sharp pair of scissors or a utility knife
Measuring tape
A clean, flat surface to work on
Having the right tools helps you make good cuts without hurting the strip. Remember, using dull tools can cause rough edges and damage the circuit.
Identify Cut Points
Next, find the cut points on your LED strip lights. Most strips have special cutting lines. These lines are marked with a scissor icon or dotted lines. These marks show where you can cut safely without hurting the circuitry.
Tip: Always check the user manual for your specific LED strip model. Some strips, especially smart ones, may not have cut points at all.
Here’s how to find cut points easily:
Locate the Cutting Marks: Look for the cutting marks on the LED strip to avoid damaging the circuitry.
Measure and Mark: Decide the length you need and mark the cutting point.
Voltage Considerations: Different LED strips have different cut intervals. For example, 12V strips usually allow cuts every 3 LEDs, while 24V strips allow cuts every 6 LEDs.
Voltage | Typical Cut Interval | Marking Frequency |
|---|---|---|
12V | Every 3 LEDs | Every ~5 cm |
24V | Every 6 LEDs | Every ~10 cm |
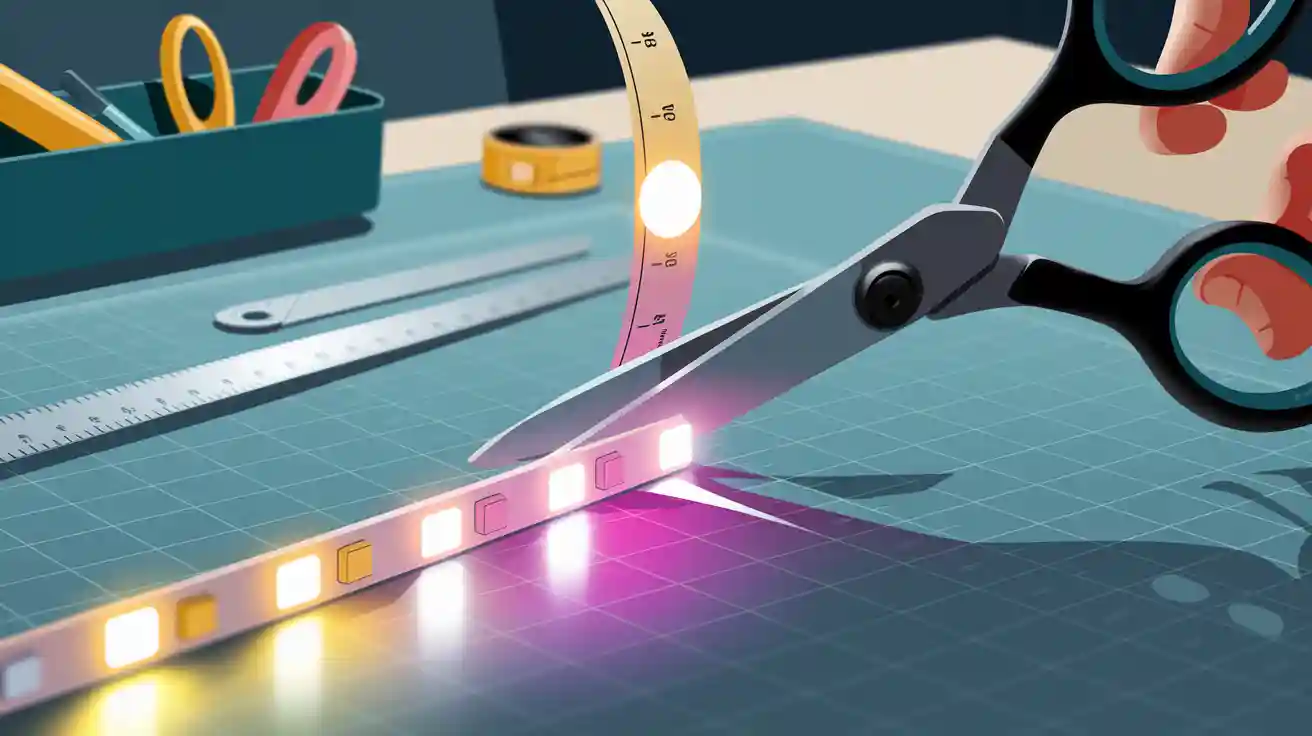
Make the Cut
Now that you’ve found the cut points, it’s time to cut. Follow these steps for a clean and safe cut:
Power Off and Unplug: Always make sure the LED strip lights are off and unplugged before cutting. This stops electrical shocks and protects the lights.
Cut Along the Marked Line: Using your sharp scissors or utility knife, carefully cut along the marked line. Keep the cut straight to avoid hurting the copper pads.
Avoid Common Mistakes:
Don’t cut outside the marked line, as this can break the circuit and make part of the strip stop working.
Avoid using dull tools, as they can hurt the circuit board.
After cutting, if you need to reconnect the pieces, you can use connectors or soldering techniques. Always test the connections to make sure everything works well.
Note: Cutting at the wrong points can cause problems, like circuit breaks, light group failure, and safety risks. Always follow the manufacturer’s guidelines to keep performance and safety.
By following these steps, you can cut LED strip lights safely and effectively, making sure they fit perfectly in your space.
Securing Connections
After you cut LED strip lights, it is very important to secure the connections. This helps your lights work correctly. Let’s look at how to use connectors well and how to test those connections.
Using Connectors
Connectors are needed to join LED strip pieces or connect them to power. Here’s how to use them properly:
Proper Strip Preparation: First, cut LED strips carefully along the cut lines. Clean the copper pads to make a good connection.
Secure Seating: Put the LED strip or stripped wire all the way into the connector. Make sure no wires are showing, as this can cause short circuits.
Strain Relief: Keep the LED strip close to the connector. This stops tension that could harm the connection.
Environmental Considerations: If you want to use your LED strips outside or in wet places, pick IP-rated connectors to keep out moisture.
Quality Matters: Always buy connectors from trusted brands. Good connectors last longer and work better, lowering the chance of problems.
Here’s a quick look at common connector types you might use:
Connector Type | Description |
|---|---|
2-Pin Connectors | Used for single-color LED strips, great for color consistency. |
4-Pin Connectors | Needed for RGB LED strips, allowing for color changes. |
Extension Connectors | Used to make LED strips longer, keeping connections secure. |
Corner Connectors | Made for smooth turns in setups, helping to go around obstacles. |
Flexible Connectors | Allow bends and twists in lighting designs, perfect for creative setups. |
Testing Connections
After you secure your connections, it’s time to test them to make sure everything works. Here are some good ways to test your LED strip light connections:
Check for Loose Cables: Make sure all connections between the power supply, controller, and LED strip are tight. Unplug extension cables and connect the power supply directly to the strip to find any problems.
Test Voltage with a Multimeter: Measure voltage at different points in the circuit to see where power is lost. Start from the power supply and check the copper pads on the LED strip.
Check for Visible Signs of Short Circuits: Look at the connections to ensure positive and negative wires are not touching.
Check for Invisible Signs of Short Circuits: Use a multimeter to check resistance between the positive and negative pads on the LED strip. Infinite resistance means no short circuit.
By following these steps, you can make sure your connections are secure and working well. Remember, handling things wrong during setup can cause problems like overheating or circuit breaks, so take your time to do it right.
Advanced Techniques for Cutting LED Strips
Soldering Wires
Soldering wires is a good way to connect LED strip lights safely. This method has many benefits compared to using connectors. For example, soldering makes a strong connection that is hard to break. It also lasts longer, which is great for tough jobs or places with bad weather. Plus, soldering works well for high-powered LED strips where a strong link is very important.
Before you start soldering, remember these safety tips:
Always turn off the power at the circuit breaker before starting any work.
Wear insulated gloves and use tools with rubber grips for safety.
Ask a qualified electrician if you are unsure about anything.
Tip: Soldering irons get very hot, so be careful. Always work in a well-ventilated area to avoid breathing in fumes.
Tips for a Clean Solder
Making a clean solder joint is important for good connections. Here are some helpful tips to achieve this:
Use solder that has rosin flux. This helps it stick better and makes a solid electrical connection.
Make sure the soldering surface is clean and free from dirt and dust.
Tin the solder pads before you start soldering. This helps make a better connection.
Heat the solder pad before adding solder. This prevents too much solder and helps it stick well.
By following these tips, you can ensure your soldering is neat and effective. Remember, a clean solder joint leads to better performance and longer life for your LED strip lights.
Cutting LED strip lights safely and well has a few important steps:
Preparation: Measure and mark how long you want, check the cutting points again, and cut where it says to.
Cutting Process: Hold the strip tight, press steadily, and make sure to cut all the way through.
Safety Precautions: Unplug the power, don’t cut any wires, and wear safety gear.
By doing these steps, you can change your lighting for any room. This makes your space look better and helps your lights last longer. Remember, a good cut can make your lights last from 25,000 to 100,000 hours! So, practice these tips and enjoy your nice LED lights.
FAQ
What tools do I need to cut LED strip lights?
You need sharp scissors or a utility knife, measuring tape, and a clean, flat surface to work on.
Can I cut LED strip lights anywhere?
No, only cut at designated points marked by scissors or dotted lines to avoid damaging the circuitry.
How do I reconnect cut LED strips?
You can use connectors or soldering techniques to reconnect cut LED strips securely. Always test the connections afterward.
See Also
Steps To Effectively Trim A COB LED Strip
Guide To Installing LED Strip Lights Successfully In 2025
Best Practices For Installing RGB LED Strip Lights


