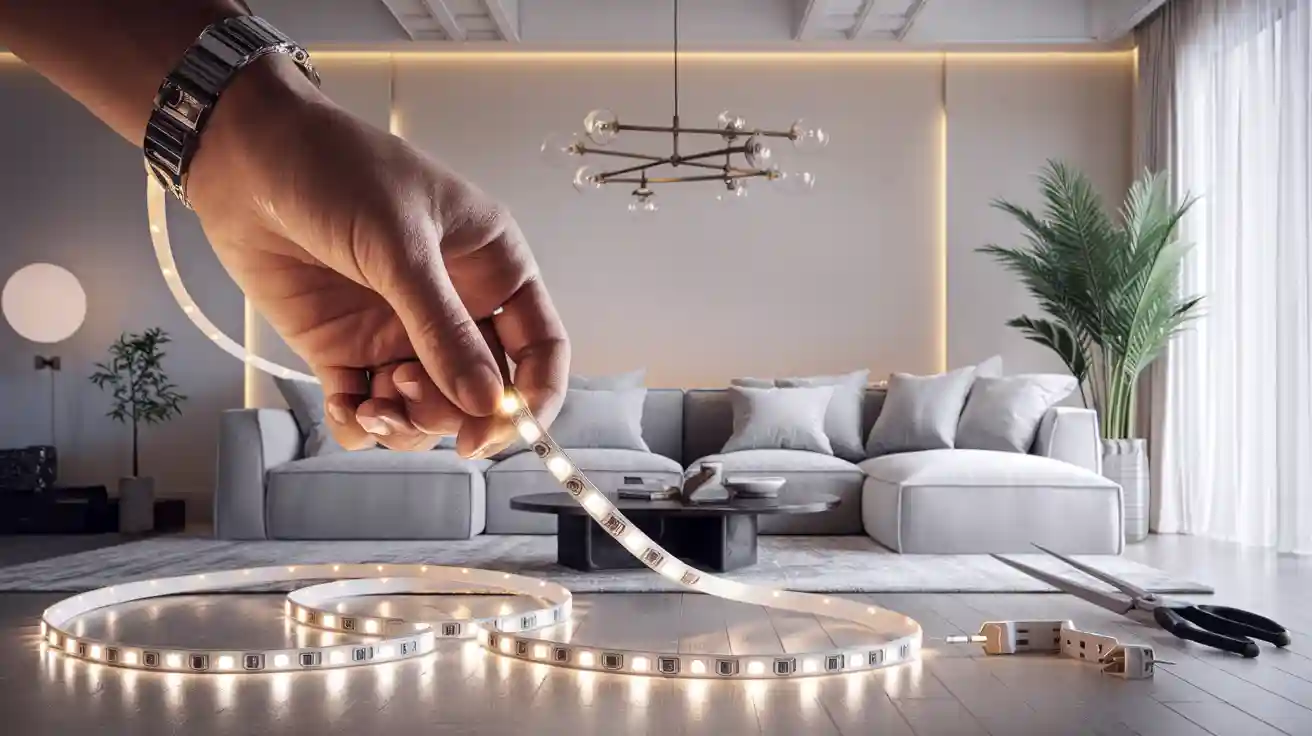
Connecting LED strip lights the right way is very important. It helps them work well and last longer. More than 60% of new homes use LED strip lights for a nice atmosphere. This shows how popular they are. Many installation problems happen because of things like incorrect power supply details or loose wires. Ensuring that you connect LED strip lights with tight connections improves safety and enhances their performance.
Key Takeaways
Pick the right tools and materials for connecting LED strip lights. This helps make strong connections and stops problems like flickering. – Use connectors for fast setups or soldering for lasting connections. Each way has its good points, so choose based on what you need. – Think about your wiring carefully. Know the differences between series and parallel connections to keep brightness and efficiency.
Tools for Connecting LED Strip Lights
To connect LED strip lights, you need special tools and materials. Using the right tools makes your connections better. It also keeps everything safe and strong.
Essential Tools
To connect LED strip lights well, gather these important tools:
Direct Soldered Connection: This needs skilled workers for custom jobs.
Plug-and-Play Connectors: These let you install quickly without tools. They are great for shops and easy setups.
Connector Cables with Adapters: These give you flexible links, good for building lights.
Corner and Multi-branch Connectors: These are made for tricky lighting designs.
Integrated Controller Connections: These help control lights in smart buildings.
Required Materials
Besides tools, you will need some materials to finish your setup:
Power Adapter: This keeps everything safe and works well by matching voltage and wattage.
Extension Cords: These connect to the power source and should be safe for outdoor use.
Connectors: These join different LED strips easily, especially for outside setups.
Mounting Clips or Adhesive Tape: These hold LED strips firmly on different surfaces.
Weatherproof Enclosures: These keep your setup safe from water and dust, making it last longer.
Using the right tools and materials is very important for a strong connection. Good connections stop problems like flickering or lights turning off suddenly. So, buy good LED strip connectors and soldering materials for a successful setup.
Methods to Connect LED Strip Lights
You can connect LED strip lights in different ways. Each way has its own benefits and things to think about. The two most common ways are using connectors and soldering the wires. Below, you will find simple steps for each method. There are also tips to help you make strong connections.
Using Connectors
Using connectors is an easy way to connect LED strip lights. This method is great for people who want a quick setup without tools. Here’s how to do it:
Connect the First Strip: Join the first part of the LED strip to the power supply with quick connectors or by soldering.
Connect Subsequent Strips: Link the next part to the first one using quick connectors or soldering. Make sure the signal flows in the same direction.
Test the Setup: After connecting all strips, turn on the power supply. Check that all parts are working properly.
Tip: Make sure the connectors are pushed together tightly. This stops them from coming apart by accident. If you see any flickering, check if the connections are tight.
The table below shows the differences between clip-on connectors and wire-to-strip connectors:
Feature | Clip-on Connectors | Wire-to-Strip Connectors |
|---|---|---|
Connection Security | Moderate (can come apart easily) | High (strong wire holding) |
Electrical Contact | Variable (might not be steady) | Consistent (direct wire contact) |
Ease of Installation | Very High (no tools needed) | Moderate (needs wire stripping, screwdriver) |
Installation Speed | Very Fast | Moderate |
Durability | Moderate (not very strong over time) | High (lasts longer against wear) |
Cost | Generally Lower | Slightly Higher |
Best For | Temporary, testing, low-stress areas | Permanent, reliable, moderate-stress areas |
Soldering the Wires
Soldering the wires gives a stronger and more lasting connection for your LED strip lights. This method is especially good for high-power setups or when you need something durable. Follow these steps for soldering:
Choose a Well-Ventilated Area: Work in a place with good airflow to avoid breathing in fumes.
Wear Safety Gear: Put on safety glasses and gloves to protect yourself from burns and splashes.
Prepare the Wires: Put solder on the ends of the wires you want to connect.
Add Solder to the Strip: Put solder on each contact point on the LED strip.
Attach the Wires: Use a soldering iron to connect the wires to their matching contact points.
Tip: When soldering, use different colours for your wires. Use red for positive and black for negative connections. This helps avoid mistakes during installation.
Soldered connections are strong and last a long time. They are great for long-term use. They handle wear and tear well, making sure the connection stays stable, especially in high-power setups. On the other hand, solderless connectors might not hold up as well in tough conditions and can wear out faster.
By following these methods, you can easily connect LED strip lights. This will help you have a reliable and efficient setup.
Wiring LED Strip Lights
When you connect LED strip lights, knowing the wiring methods is very important. You can pick between series and parallel connections. Each type has its own features and effects on your setup.
Series Connections
In a series connection, you link several LED strips one after another. This method needs more voltage as you add more strips. Each LED uses the same current, which can make wiring tricky.
Note: Using series connections can cause big voltage drops, especially with longer strips. This makes the lights dimmer and less colourful. The further the LEDs are from the power source, the dimmer they get.
Here are some important points about series connections:
Voltage goes up with each extra LED strip.
Current stays the same all through the circuit.
This method can be harder because of the higher voltage needs.
Parallel Connections
Parallel connections take a different route. Each section of LED strip connects straight to the power supply. This way, each section gets the same voltage. This setup reduces voltage drops and keeps brightness steady across all LEDs.
In a parallel circuit, the total current from the power supply spreads among the LEDs.
Each LED works on its own, giving even light, which is great for bigger setups.
The table below shows the differences between series and parallel wiring for LED strip lights:
Wiring Type | Voltage Characteristics | Current Characteristics | Complexity |
|---|---|---|---|
Series | Voltage goes up with more LEDs | Current stays the same | More complicated because of higher voltage needs |
Parallel | Voltage stays the same across LEDs | Current goes up with more LEDs | Less complicated but needs more wiring |
Power Supply Compatibility
Making sure your power supply works with your connections is very important for both series and parallel setups. Here are some good tips:
Voltage Matching: Make sure the LED driver output voltage matches the LED strip voltage (e.g., 12V driver for 12V strips).
Power Rating: The driver’s power output should be more than the total wattage of the LED strip by at least 20%.
Correct Polarity: Connect positive and negative wires correctly to avoid damage.
Short Cable Runs & Thick Wires: Keep the driver close to the LED strip and use thick wires to reduce voltage drop.
Proper Insulation: Use heat shrink tubing or electrical tape for insulation to stop short circuits.
Waterproofing for Outdoor Use: Use waterproof connectors and enclosures for outdoor setups.
Power Supply for Long Strips: For strips longer than 5 metres, power in sections to keep brightness.
Grounding Metal Drivers: Properly ground metal housing drivers to stop electric shocks.
Troubleshooting Carefully: If the strip doesn’t light up, check wiring and voltage before trying again.
Seek Professional Help: Ask a qualified electrician for help with complex setups.
By knowing the differences between series and parallel connections, you can make smart choices when connecting LED strip lights. This knowledge helps keep your setup efficient and reliable.
Common Mistakes and Troubleshooting
Mistakes to Avoid
When you connect LED strip lights, there are some common mistakes to avoid. Here are frequent errors to keep in mind:
Mistake Category | Description |
|---|---|
Poor Planning and Incompatible Components | If you rush planning, parts may not match, causing problems. |
Choosing the Wrong Type of LED Strip Light | Not matching the strip’s performance to your needs can lead to weak lighting. |
Ignoring Control Compatibility | Forgetting control needs can make your installation not work. |
Incorrect Power Supply Selection | Using the wrong voltage or not enough wattage can cause power problems. |
Poor Strip Light Layout Planning | Not planning the layout can create messy and hard-to-manage setups. |
Wiring Errors and Poor Connections | Bad connections can ruin your work; common issues include reversed wires and loose connections. |
Improper Mounting and Adhesion | Bad mounting can cause strips to sag and overheat. |
Mishandling the LED Strips | Rough handling can make the strips fail early. |
Skipping Testing Before Final Installation | Not testing before finishing can lead to finding problems later. |
Troubleshooting Tips
If you have problems with your LED strip lights, try these troubleshooting steps:
Check Power Supply: Make sure the power supply is not too full and matches what the LED strip needs.
Inspect LED Strip: Look for any visible damage or wear on the LED strip.
Assess Controller Connectivity: Check the cables connecting the controller to the LED strip for any damage.
Evaluate Environmental Factors: Think about how extreme temperatures and sunlight can affect the LED strips.
Test Remote Control: Check the remote for battery problems and ensure it is paired with the controller.
If you see flickering or dimming, consider these common causes:
Voltage Fluctuations: LED lights can flicker if the voltage changes. Solutions include checking the electrical system and power supply.
Incompatible Dimmer Switches: Using dimmers that are not for LEDs can cause flickering. Make sure dimmers are made for LED use.
Overloading the Circuit: Too many LEDs on one circuit can cause flickering. Spread lights across different circuits to help.
By avoiding these mistakes and using the troubleshooting tips, you can connect LED strips successfully and enjoy reliable lighting.
To sum up, connecting LED strip lights needs careful planning and doing things right. Follow these important steps for a good installation:
Pick the right LED strip lights and power supply.
Get the area ready by cleaning the surface.
Use the right connection methods, like connectors or soldering.
Make sure heat can escape and waterproof if needed.
By following these tips, you can improve how well your LED strip lights work and how long they last. Remember, a good installation means reliable and efficient lighting.
Tip: Regularly cleaning and checking connections will help your setup last longer.
FAQ
What voltage do LED strip lights require?
Most LED strip lights operate on 12V or 24V. Always check the specifications before connecting to avoid damage.
Can I cut LED strip lights?
Yes, you can cut LED strip lights at designated points. Ensure you reconnect them properly for continued functionality.
How do I power long LED strips?
For strips longer than 5 metres, use multiple power supplies or connect power at both ends to maintain brightness.
See Also
Connecting Cob Lighting Strips: A Step-By-Step Guide
Effective Installation Tips For RGB LED Strip Lights
Choosing The Perfect LED Strip Lights For Linear Lighting


