Have you noticed your LED strip lights acting up lately? Maybe they’re flickering, or the colors seem off. Don’t worry—you’re not alone. Did you know that LEDs have a general failure rate of about 3%? In some cases, this number can climb to 10% or even 20%, meaning two out of ten LED light strip setups might face issues. These common issues can be frustrating, but with the right approach, you can fix them and get your lights shining bright again.
Key Takeaways
Turn off the power first to avoid shocks and damage.
Pick good power supplies to stop flickering and keep lights steady.
Clean your LED strips often to keep them bright and lasting longer.
Safety Tips for Fixing LED Strip Lights
Turn Off Power First
Always turn off the power before touching your LED light strip. This step is simple but often forgotten. Working on powered strips can cause shocks or short circuits.
Tip: Double-check the power is off before starting repairs. Stay safe!
Here’s why this matters:
Turning off power stops shocks when handling wires.
It helps protect the LED strip and other devices.
Skipping this step has caused injuries during removal before.
Only grab your tools after unplugging everything.
Use Safe Tools and Avoid Water
Use insulated tools when fixing LED strips. These tools keep you safe from live wires. They are made for electrical work and prevent accidents.
Keep your workspace dry. Water and electricity are dangerous together. Don’t work near sinks or wet areas. Even a little water can damage your LED strip or cause a short circuit.
Pro Tip: Use a dehumidifier if your workspace is humid.
Read the Manufacturer’s Instructions
Each LED strip is unique, so follow the manual carefully. These instructions are made for your product and help avoid problems. For example:
An office fixed lighting by replacing drivers after reading the manual.
An art gallery repaired vintage lights by following the guide.
A homeowner stopped flickering by adjusting the power supply as suggested.
By using the manual, you’ll make fewer mistakes and keep your LED strip working longer.
Troubleshooting and Fixing LED Light Strips
How to Fix Flickering LED Strips
Flickering lights can be distracting and frustrating. This problem usually happens because of power issues or loose wires. First, check the power source. Make sure the voltage matches your LED strip. If the power supply is unstable, it can cause flickering.
Next, look at the connections. Loose wires can stop electricity from flowing properly. Tighten any loose wires and replace damaged ones if needed.
Tip: Good-quality power supplies lower electrical noise and prevent flickering.
If flickering continues, try using a better power supply. This easy fix often solves the problem.
Solving Color Inconsistencies
Color problems in LED strips can ruin the mood of your room. These problems happen because of bad materials, wrong setup, or overheating.
Here’s how to fix it:
Reset the LED strip and controller. A reset can fix color syncing issues.
Replace broken chips. If some parts show wrong colors, the chips might be damaged.
Cause of Color Problem | What Happens |
|---|---|
Cheap Materials | Weak diodes wear out fast, causing color changes. |
Poor Design | Bad heat control makes diodes change color faster. |
Wrong Installation Location | Heat problems happen if strips are installed poorly. |
To avoid future problems, pick high-quality LED strips and install them with good heat control.
Replacing Dead LEDs
Dead LEDs are a common issue in LED strips. You’ll see dark spots where LEDs stop working. Here’s how to fix them:
Turn off the power for safety.
Find the dead LEDs by checking unlit areas.
Carefully remove the broken LEDs using the right tools.
Check the wires to make sure electricity flows correctly.
Replace the dead LEDs with new ones that match your strip.
Put the strip back together and watch for future issues.
Pro Tip: Overheating often causes burnt LEDs. Better heat control can stop this.
If you’re unsure, ask a professional for help.
Fixing Adhesive Failure
Sometimes LED strips don’t stick well to surfaces. This happens because of dust, moisture, or weak adhesive.
To fix it:
Clean and dry the surface before sticking the strip again.
Use stronger adhesive or double-sided tape for better results.
Note: Preparing the surface properly stops adhesive problems.
For lasting results, keep the area free of dust and moisture.
Resolving Controller Problems
Controller issues can stop your LED strips from working right. If the controller doesn’t respond, try resetting it. Most controllers have a reset button or steps to follow.
If resetting fails, the controller might be broken. Replace it with one that works with your strip. Always follow the instructions from the manufacturer.
Addressing Power Supply Issues
Power supply problems can cause flickering, uneven brightness, or total failure. To fix this:
Check if the power supply is working and has the right voltage.
Replace cheap power supplies with better ones for stable performance.
Good voltage keeps your LED strips safe from damage caused by power changes.
Uneven Brightness Solutions
Uneven brightness happens often in long LED strips. This is usually caused by voltage drop.
Here’s how to fix it:
Check the power supply. Make sure it’s strong enough for the whole strip.
Look at the wiring. Bad connections can cause voltage drop.
Use the right wires and good connections to reduce voltage loss.
Tip: For long strips, use a voltage regulator or split the strip into smaller sections with separate power sources.
Preventing Overheating or Burning Smells
Overheating can harm your LED strips and might be dangerous. If you smell burning, turn off the power right away.
To stop overheating:
Don’t use too much voltage on the strip.
Make sure there’s airflow around the strip to cool it down.
Choose high-quality LED strips made for better heat control.
Regular checks can help you find problems early and keep your strips safe.
Preventive Measures for LED Strip Lights
Installing LED Strips the Right Way
Putting up LED strip lights properly avoids future problems. Pick the right surface and adhesive for the job. Smooth walls work well with sticky adhesives. For bumpy walls, foam tape works better. On metal or hot surfaces, use epoxy resin instead.
Surface Type | Best Adhesive | Where to Use |
|---|---|---|
Smooth Walls | Sticky Adhesive | Indoor Areas |
Textured Walls | Foam Tape | Outdoor Spaces |
Metal Surfaces | Epoxy Resin | Hot Locations |
Temperature and moisture affect adhesives too. Heat can weaken glue, and humidity can break the bond. To fix this, use mounting clips. Clips hold strips steady and spread weight evenly, even on upright surfaces.
Tip: Don’t bend the strips too much when installing. This keeps them working longer without breaking.
Picking the Right Power Supply
A good power supply helps your LED strips work well. Choose one with high efficiency and a power factor near 1. This means it uses most of the energy it gets.
Factor | What It Means |
|---|---|
Efficiency | Shows how much energy powers the LEDs. Higher numbers are better. |
Power Factor | Compares used power to drawn power. Closer to 1 is more efficient. |
Match the power supply to your LED strip’s voltage and current needs. Using the wrong one can cause flickering or damage. If unsure, check the manual for advice.
Easy Maintenance Tips
Taking care of LED strips makes them last longer. Clean them often to stop dirt from dimming the lights. Seal cut ends or connections with silicone to keep water out.
Maintenance Task | How It Helps |
|---|---|
Cleaning Dirt | Keeps lights bright over time |
Regular Care | Extends the life of the product |
Expected Lifespan | Around 30,000 hours with care |
Pro Tip: Use covers for outdoor strips. They protect against bad weather and damage.
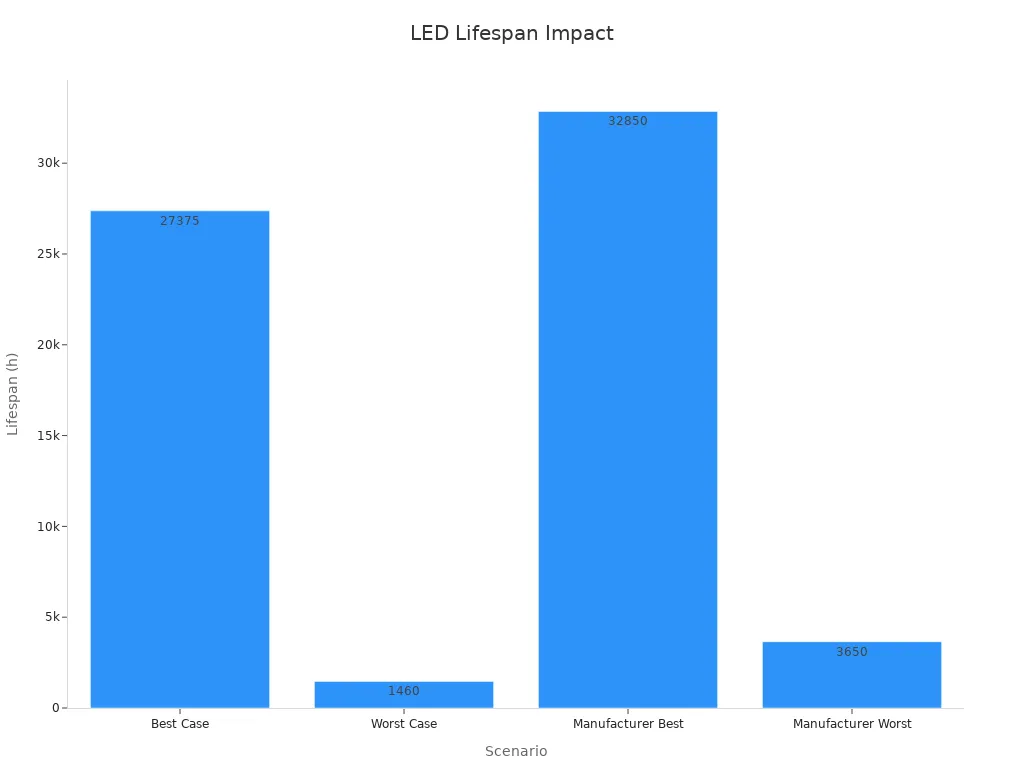
Studies show that good care makes LED strips last much longer. Without care, they might only last 1,460 hours. With regular cleaning and checks, they can shine for up to 32,850 hours.
By following these tips, you’ll have fewer problems and enjoy brighter, longer-lasting LED strip lights.
Troubleshooting your LED strip lights doesn’t have to be complicated. By tackling issues like flickering or uneven brightness and following preventive steps, you can keep your LED setup running smoothly. Regular care and proper installation go a long way. With these tips, your LED lights will shine brighter and last longer! ✨
FAQ
Why are my LED strips not turning on?
Check the power supply and connections. Ensure the voltage matches your LED strip. If everything looks fine, the controller might need replacing.
Can I cut my LED strip to fit a specific length?
Yes, most LED strips have marked cutting points. Use scissors to cut along these marks. Avoid cutting elsewhere to prevent damage.
How do I clean my LED strips?
Use a soft, dry cloth to wipe the LED strip. Avoid water or cleaning solutions, as they can damage the strip or cause electrical issues.
See Also
Selecting The Perfect LED Strip Lights For Linear Lighting
Effective Installation Tips For RGB LED Strip Lights
Best Practices For Installing LED Strip Lights In 2025
Understanding Cob LED Strips And Their Functionality
Top Five Tips For Selecting The Best LED Strip Lights


