When you connect COB cob led strips, you ensure both optimal performance and safety. Proper connections are crucial for the longevity of your LED setup. Loose wires or incorrect connections can lead to malfunctions or even safety hazards. You should always prioritize secure connections to avoid these issues. Remember, heat is a common cause of LED failure, so ensuring a snug fit helps in dissipating heat effectively. By taking the time to connect everything correctly, you not only enhance the performance of your COB lighting strip but also extend its lifespan.
Types of Strip Connectors for COB Lighting Strip

When you’re setting up your cob led strip lights, choosing the right connector is crucial. Different types of led strip light connectors serve various purposes, ensuring that your lighting setup is both efficient and reliable. Let’s dive into the main types of connectors you might encounter.
Tape to Wire Connectors
Tape to wire connectors are perfect when you need to connect your led strip lights to a power source. These connectors allow you to attach wires directly to the cob strip, making them ideal for installations where the power source isn’t immediately adjacent to the strip. You simply insert the strip into the connector and secure it. This type of solderless cob led connector is user-friendly and doesn’t require any special tools. Just make sure the connector matches the width and pin configuration of your led tape light.
Tape to Tape Connectors
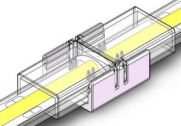
If you’re looking to extend your cob led strip lights, tape to tape connectors are your go-to option. These connectors join two strips together seamlessly, allowing for a continuous flow of light. They’re especially useful when you want to cover a larger area without any breaks in illumination. Like other solderless options, these connectors are easy to use. You align the strips within the connector, ensuring a snug fit. This method keeps your setup neat and efficient.
Wire to Wire Connectors
Wire to wire connectors come in handy when you need to connect different sections of wiring within your led setup. These connectors are versatile, allowing you to join wires without soldering. They are particularly useful for complex installations where multiple led connectors are necessary. By using these solderless connectors, you can easily manage and organize your wiring, ensuring a clean and professional look.
Choosing the right led strip light connectors ensures that your cob lighting setup functions optimally. Whether you’re extending your strips or connecting them to a power source, there’s a connector designed to meet your needs. Always ensure compatibility with your specific cob strip to maintain a secure and efficient connection.
Step-by-Step Connection Process for COB Lighting Strip

Connecting your cob lighting strip might seem daunting, but with a clear process, you can achieve a seamless setup. Let’s walk through the steps to ensure your cob led strip lights shine brightly and efficiently.
Preparing the COB Lighting Strip
Before you start, gather all necessary tools and materials. This preparation ensures a smooth installation process.
Cutting the Strip to Desired Length
To begin, measure the area where you plan to install the cob led strip lights. Use sharp scissors to cut the strip at the designated cutting points. These points are usually marked on the strip, ensuring you don’t damage the led components. Cutting at the right spot is crucial for maintaining the integrity of the cob strip.
Stripping the Wire Ends
Next, prepare the wire ends for connection. Use a wire stripper to remove about a quarter-inch of insulation from each wire. This step exposes the copper, allowing for a solid connection. Make sure the exposed wire is clean and free of any frayed strands.
Connecting the Strip to the Connector
Now that your cob lighting strip is ready, it’s time to connect it to the connector. This part of the process ensures your led strip lights receive power efficiently.
Aligning the Strip with the Connector
Take your led strip light connectors and align them with the cob strip. Ensure the copper pads on the strip match the metal contacts in the connector. Proper alignment is key to a successful connection. If you’re using a solderless connector, simply insert the strip into the slot and close the latch.
Securing the Connection
Once aligned, secure the connection by pressing down on the connector. This action locks the strip in place, ensuring a stable connection. A secure fit prevents any loose connections that could disrupt the flow of electricity.
Testing the Connection
With the cob led strip lights connected, it’s time to test your setup. This step verifies that everything works as intended.
Checking for Proper Polarity
First, check the polarity of your connection. Ensure the positive and negative wires are correctly aligned with the power source. Incorrect polarity can prevent your led lights from working or even cause damage.
Ensuring a Secure Fit
Finally, give the cob lighting strip a gentle tug to ensure it’s securely connected. A snug fit means your led strip lights will function without interruption. If everything feels solid, you’re ready to enjoy your new lighting setup.
By following these steps, you can confidently connect led strips and create a stunning lighting display. Whether you’re looking to connect two cob led strips or just one, this guide ensures a successful installation every time.
Technical Considerations for COB Lighting Strip
When setting up your cob lighting strip, understanding the technical aspects ensures a smooth and efficient installation. Let’s dive into some key considerations.
Understanding Polarity
Polarity plays a crucial role in connecting your cob led strip lights. You need to ensure that the positive and negative wires align correctly with the power source. Incorrect polarity can prevent your led strip lights from functioning or even cause damage. Always check the markings on your cob strip and the power supply to match the positive and negative terminals. This step is vital for the longevity and performance of your led setup.
Power Supply Compatibility
Choosing the right power supply is essential for powering your cob led strip lights effectively. You must ensure that the power supply matches the voltage and current requirements of your cob strip. An incompatible power supply can lead to insufficient power delivery or overheating, which might damage your led lights. Check the specifications of your cob strip and select a power supply that meets those needs. This compatibility ensures that your led strip lights operate efficiently and safely.
By understanding these technical considerations, you can confidently set up your cob lighting strip. Proper attention to polarity and power supply compatibility will enhance the performance and lifespan of your led strip lights.
You’ve now mastered the key steps to connect your COB lighting strips and connectors. Remember, a secure connection ensures your LED strip lights shine brightly and efficiently. If you encounter issues, start by checking each component. Disconnect and reconnect power supplies to identify any faulty parts. This methodical approach helps resolve common problems. Always follow instructions carefully for the best results. By doing so, you ensure your LED setup remains safe and functional, providing you with the perfect lighting experience.
See Also
Understanding COB And SMD LED Strip Light Differences
Selecting The Perfect LED Strip Lights For Linear Lighting
Step-By-Step Guide To Wiring A LED Light Bar


