Creating your own customizable LED light bar can make exhibits shine. This DIY project lets you design lights to fit your style. It costs less than buying ready-made ones and offers more options. You can change brightness, colors, and effects easily with your customizable LED light bar. LED lights make displays clearer and look more professional. Whether showing products or art, good lighting improves the display. It also makes your audience remember your exhibit better.
Key Takeaways
Making your own LED light bar costs less and lets you design it your way.
Pick good materials, like LED strips and aluminum channels, for strong and bright lighting.
Think about the size, brightness, and spot to place it for the best look.
Check and fix your LED light bar often to keep it working and looking nice.
Use smart tools and apps to change colors and effects easily, making your exhibit more exciting.
Materials and Tools for Building LED Light Bars

Making your own LED light bars starts with collecting materials. Having everything ready makes the process easier and faster. Here’s what you’ll need:
Important Materials
LED strips (RGB or single color, brightness options)
Pick LED strips based on your display’s needs. RGB strips are great for colorful, adjustable lights. Single-color strips give a simple, neat look. Choose the right brightness for your display’s size and purpose.
Aluminum channel or housing
Aluminum channels hold the LED strips firmly in place. They also help cool the lights, making them last longer. Channels with diffusers create a softer, even light.
Power supply and connectors
A good power supply keeps your lights working well. Make sure it fits your LED strips’ voltage and wattage. Use strong connectors to keep wires secure and avoid loose ends.
Soldering materials (soldering iron, solder wire, heat shrink tubing)
Soldering makes strong connections between wires and LED strips. Heat shrink tubing protects these connections from damage over time.
Wires and connectors
Flexible wires help connect LED strips to the power supply. Connectors make it easy to join strips or extend wires.
Needed Tools
Wire cutters and strippers
These tools cut wires to the right size and remove insulation.
Screwdrivers and mounting hardware
Screwdrivers attach the aluminum channel to your display. Use screws or brackets to keep the light bar steady.
Multimeter for testing
A multimeter checks if your connections work properly. It helps find problems before turning on the lights.
Optional: 3D printer for custom mounts or enclosures
A 3D printer can make special mounts or covers for your lights. This gives your display a polished, professional look.
Pro Tip: Keep extra tools like a drill, tape measure, and electrical tape nearby. These tools help with easy setup and perfect placement of your light bar.
By preparing these materials and tools, you’re ready to succeed. With good planning, you can make LED light bars that improve your display and impress others.
Planning and Designing Your Customizable LED Light Bar
Understanding Lighting Needs
Checking exhibit size and layout
Look at how big your exhibit is. Bigger spaces need brighter lights. Smaller areas work well with softer lights. Think about where your displays are placed. Find spots needing bright light or soft light. This helps your LED light bar look great and professional.
Picking brightness and color temperature
Choose LED strips with brightness you can adjust. RGB strips are colorful and flexible for lively displays. Single-color strips are good for steady tones. Warm colors feel cozy, while cool colors show details clearly.
Tip: Use energy-saving lights to save power but keep them bright.
Creating the Light Bar
Choosing length and placement
Decide how long your light bar should be. Measure where it will go to make sure it fits. Place it carefully to avoid glare or shadows. This gives even light across your display.
Planning wires and power setup
Plan your wires to keep things neat. Use flexible wires and connectors for easy setup. A tidy wiring plan makes your exhibit look better and work well.
Pro Tip: Pick LED strips with adjustable angles for better lighting in different setups.
Keeping It Safe and Strong
Handling heat
LEDs can get hot, which may hurt their performance. Use aluminum channels or special boards to cool them down. These materials help heat escape and keep LEDs working longer.
Material Type | Thermal Conductivity (W/mk) | Description |
|---|---|---|
FR-4 | 6-10 times less than copper/aluminum | Cheap but not great at cooling. |
Ceramic | High conductivity, used in harsh environments | Good for tough conditions. |
MCPCB | 190 (aluminum alloy) | Best for cooling and heat control. |
Picking strong materials
Use tough materials to protect your light bar. Aluminum channels keep LED strips safe and sturdy. For outdoor displays, pick materials that block dust and water.
Note: Testing heat flow early can stop problems later. This keeps your light bar working well.
By planning and designing carefully, your LED light bar will look amazing. It will also make your exhibit stand out and impress visitors.
Step-by-Step Guide to Building the LED Light Bar

Getting the Materials Ready
Cutting LED strips to the right length
Measure the area where the LED light bar will go. Cut the LED strips at the marked spots using scissors or a sharp knife. These marks show safe places to cut without breaking the circuit. Cutting carefully helps the strips fit your design perfectly.
Tip: Test the LED strips after cutting to make sure they work. This avoids wasting time fixing problems later.
Preparing the aluminum channel
Cut the aluminum channel to match the size of your LED strips. Smooth the edges with sandpaper to avoid cuts during setup. If using a diffuser, attach it to the channel for softer lighting. Drill small holes for screws or brackets to mount the channel securely. This step makes the housing ready for installation.
Wiring and Connecting
Hooking up LED strips to the power supply
Plan where the wires will go, keeping them away from heat or moving parts. Use flexible wires to connect the LED strips to the power source. Make sure the wires are long enough to reach without pulling. Wrap the connections with electrical tape to stop short circuits.
Soldering wires and making strong connections
Solder the wires to the LED strips at the solder pads. Cover the soldered parts with heat shrink tubing and seal them with a heat gun. This protects the connections from damage. Use a multimeter to check that everything works correctly.
Note: Safe and secure connections are key for reliable LED lights.
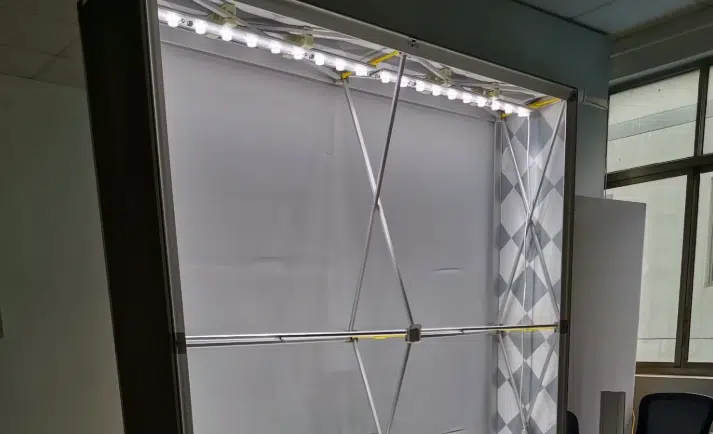
Installing the Light Bar
Sticking LED strips to the aluminum channel
Peel off the sticky backing from the LED strips. Press them firmly into the aluminum channel. For extra hold, use clips or brackets to keep the strips in place. This stops them from coming loose later.
Attaching the light bar to the display
Place the aluminum channel on your exhibit and mark where to mount it. Use screws or brackets to fix the light bar securely. Make sure it’s straight to give even light across the display. Test the lights after mounting to ensure they work properly.
Pro Tip: Adjust the light bar’s angle to reduce glare and shadows. This improves the overall look of your lighting.
By following these steps, you can build a strong and useful LED light bar. This project saves money and lets you customize the lighting to fit your needs.
Testing and Troubleshooting
Checking connections with a multimeter
Before turning on your LED light bar, check all connections. Use a multimeter to test if they work. Set it to measure voltage or continuity. Place the probes on soldered spots or power terminals. If the voltage is correct, the wiring is fine. For continuity, a beep or low resistance means the connection is good.
Tip: If there’s no voltage or beep, check the wires again. Loose or bad soldering is often the problem. Fix these before turning on the lights to avoid damage.
Turning on and testing the lights
After checking connections, turn on your LED light bar. Plug in the power and switch it on. Watch the lights closely. Flickering means loose wires. Dim lights may need more power. If lights don’t work, check for burnt bulbs or a bad power supply.
Follow the maker’s guide for fixing problems like flickering or dim lights. Fixing issues quickly keeps your lights safe and working well. A good setup makes your exhibit look great and avoids future trouble.
Pro Tip: Use a troubleshooting chart to find problems faster. It saves time and effort during setup.
By testing and fixing problems, your LED light bar will work perfectly. This step ensures your lights look amazing and impress everyone who sees them.
Customization and Programming for LED Lighting
Adding a Controller
Picking the right LED controller
To make your LED light bar amazing, you need a good controller. Think about what you want your lights to do. Do you prefer simple colors or cool effects like flashing? Basic controllers with built-in effects are easy to use. For more control, try microcontrollers like Arduino or Raspberry Pi. These let you create endless designs. Make sure the controller works with your LED type, like RGB or single-color strips.
Hooking up the controller to the light bar
Connecting the controller is simple. First, plan where the wires will go. Use flexible wires to link the controller, LED strips, and power supply. Follow the manual to connect the data, power, and ground wires correctly. Secure the connections with solder or strong connectors. Test everything with a multimeter before turning it on. A good connection makes your lights work smoothly and look great.
Customizing Lighting Effects
Changing brightness and colors
Once the controller is ready, you can adjust brightness and colors. Many controllers have easy-to-use apps or buttons. You can dim the lights for a calm mood or make them bright for a fun display. RGB LED strips let you pick from many colors to match your style. This helps set the perfect vibe for your exhibit.
Creating cool effects (like fading or flashing)
Make your lights exciting by adding effects like fading or flashing. Use tools like FastLED or rpi_ws281x to design patterns. If you have a microcontroller, write simple code to control the effects. Test your lights often to make sure they look right. Fun effects can grab attention and make your exhibit unforgettable.
Smart Features and Integration
Adding smart home controls
Smart features make your LED lights easier to use. Systems like Alexa or Google Assistant let you control lights with your voice. You can also set timers to turn lights on or off automatically. These features save energy and make your setup more interactive.
Using phone apps for control
Phone apps make controlling your lights super easy. With just a few taps, you can change colors, adjust brightness, or pick preset effects. Some apps let you schedule effects for special events. For example, you can set soft lighting for a quiet evening or bright effects for a party. Apps give you full control over your lights anytime.
Pro Tip: Use apps with timers to automate your lights. This saves time and keeps your setup running smoothly.
Tips for Optimizing LED Lighting for Exhibit Displays
Making Displays Brighter
Placing lights for even brightness
To light your exhibit evenly, place LED light bars carefully. Keep them spaced equally to avoid dark areas. Tilt the lights to spread brightness across the display. Studies show lowering blue light can reduce glare. Balance the brightness of nearby areas to improve the look. These steps make your exhibit clear and easy to view.
Tip: Add diffusers to soften the light and reduce sharp shadows.
Stopping glare and shadows
Glare and shadows can ruin how your exhibit looks. To stop glare, place lights above or below eye level. This keeps light from shining directly into eyes. Use several lights from different angles to reduce shadows. Combine overhead lights with side-mounted LED bars for better results. This setup makes your display brighter and more balanced.
Setting the Mood
Picking color temperature for the right feel
Color temperature changes how your exhibit feels. Warm tones (2700K–3000K) feel cozy and welcoming. Neutral tones (3500K–4000K) are energizing and modern. Cool tones (4000K–5000K) show details clearly and look realistic.
Color Temperature (K) | Mood Effect | Best For |
|---|---|---|
2700K – 3000K | Cozy and warm | Living rooms, dining spaces |
3500K – 4000K | Bright and modern | Offices, sleek exhibits |
4000K – 5000K | Clear and detailed | Art displays, work lighting |
Choose the right tone to match your exhibit’s theme and purpose.
Trying fun light effects
Cool effects like fading or flashing make exhibits exciting. Use LED controllers to create these effects. A slow fade between colors feels calm, while flashing lights grab attention. Test different effects to see what works best. Fun lighting effects make your exhibit stand out and keep people interested.
Keeping Lights Working
Checking wires and parts often
Regular checks keep your LED lights working well. Look for loose wires or broken parts. Clean the lights to remove dust that dims them. Test the system often to catch problems early. Good maintenance keeps your exhibit looking great.
Fixing broken parts
Some parts may wear out over time. Replace broken wires, connectors, or LED strips quickly. Most LEDs last over 50,000 hours but fixing issues early helps them last longer. Replacing parts on time keeps your lights bright and reliable.
Pro Tip: Have extra parts ready for quick fixes during events.
By following these tips, your LED lights will shine brightly and last longer. Your exhibit will look amazing and leave a strong impression on visitors.
Making your own LED light bar is a fun project. It helps improve how your exhibit looks. Start by getting materials, planning, building, and testing the light bar. Try different designs to find cool lighting effects. These can grab people’s attention. Doing it yourself costs less and lets you decide how it looks. Use this chance to make your exhibits stand out with great lighting that people will remember.
FAQ
1. Can I use any type of LED strip for my light bar?
No, not all LED strips will work. Pick strips based on your needs. RGB strips are great for colorful effects. Single-color strips are simple and neat. Make sure they match your power supply and fit your display.
2. Do I need soldering skills to build an LED light bar?
Basic soldering skills are helpful for strong connections. If you’re new, practice on extra wires first. You can also use solderless connectors. These are easier for beginners to handle.
3. How do I prevent my LED light bar from overheating?
Use aluminum channels to cool the lights. Don’t overload the power supply. Make sure there’s good airflow around the lights. Test during setup to find and fix heat problems early.
4. Can I control my LED light bar with my smartphone?
Yes, many LED controllers work with phone apps. These apps let you change brightness, colors, and effects easily. Check that the controller matches your LED strips for smooth use.
5. What’s the lifespan of an LED light bar?
LED strips can last over 50,000 hours if cared for. Clean them often and check for loose wires. Replace broken parts quickly to keep them working well.
Pro Tip: Keep extra parts ready for quick repairs during events.
See Also
Setting Up LED Light Bars For Lightbox Displays
Understanding The Functionality Of LED Light Bars In Lightboxes
Using Edgelit LED Bars For Effective Signage Illumination


