
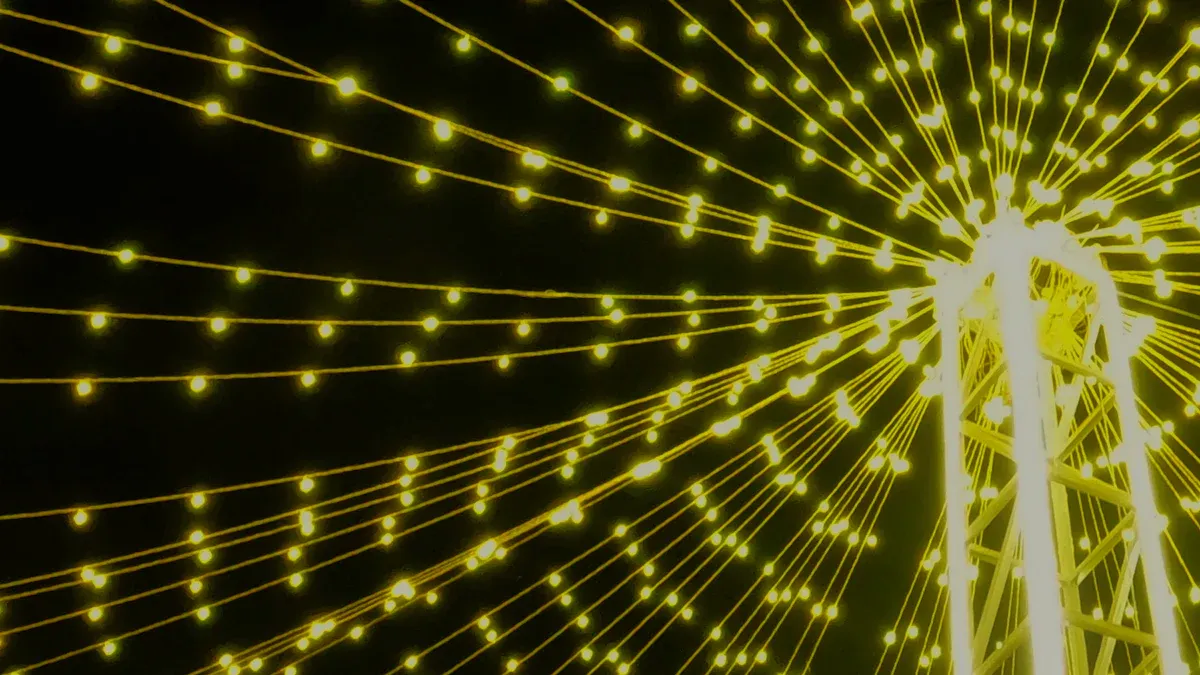
Outdoor lighting transforms spaces, bringing vibrant energy to gardens, patios, or driveways. An RGB LED strip waterproof design prevents water and moisture damage, making it ideal for outdoor use. Ensure proper installation to extend their lifespan. Thoughtful placement and secure connections protect them from harm, keeping your lights shining beautifully for years to come.
Key Takeaways
Pick the best spots for your outdoor LED lights. Think about paths, seating areas, or garden features to make them look great.
Check the waterproof rating of LED strips before buying them. Ratings like IP65 or IP68 protect better from water and dirt.
Clean and dry surfaces properly before putting the lights on. This helps the glue stick well and stops lights from falling.
Plan Your Installation
Decide Where to Put Outdoor LED Strip Lights
Before setting up your outdoor LED strip lights, think about where they will look best. Placement is key to making them effective and safe. Keep these points in mind when choosing a spot:
Purpose of the lights: Place them along paths for better visibility or near seating areas for a warm feel.
Visual appeal: Use them to highlight garden edges, building features, or fountains for a beautiful effect.
Uniform light: Make sure the light spreads evenly to avoid dark patches or overly bright spots.
Metric | Value Range | Findings |
|---|---|---|
Colour Correlated Temperatures (CCT) | 2850–5800K | Even light spread is more important than brightness for outdoor safety. |
Average Brightness (lx) | 2.5–20 lx | 2.5 lx with 2:1 uniformity is as safe as 20 lx with 15:1 uniformity. |
Uniformity Ratio | 2:1 and 15:1 | Better uniformity ratios save energy while keeping safety levels high. |
Measure the Space for Proper Installation
Measuring correctly is important for easy installation. Use a tape measure to check the length of the area where the lights will go. Include corners and curves to avoid running out of lights during setup.
Planning your layout ahead of time helps you imagine the final result and saves effort. Draw a simple map of the area, showing where the lights will be placed. This ensures you have enough materials and reduces mistakes.
Tip: Measure twice to double-check your numbers. This small step can save you from big errors later.
By planning carefully, you make your project easier. Good placement and accurate measurements make your outdoor LED strip lights look neat and work well.
Choose the Right RGB LED Strip Waterproof Options
Learn About IP Ratings for Waterproof LED Strip Lights
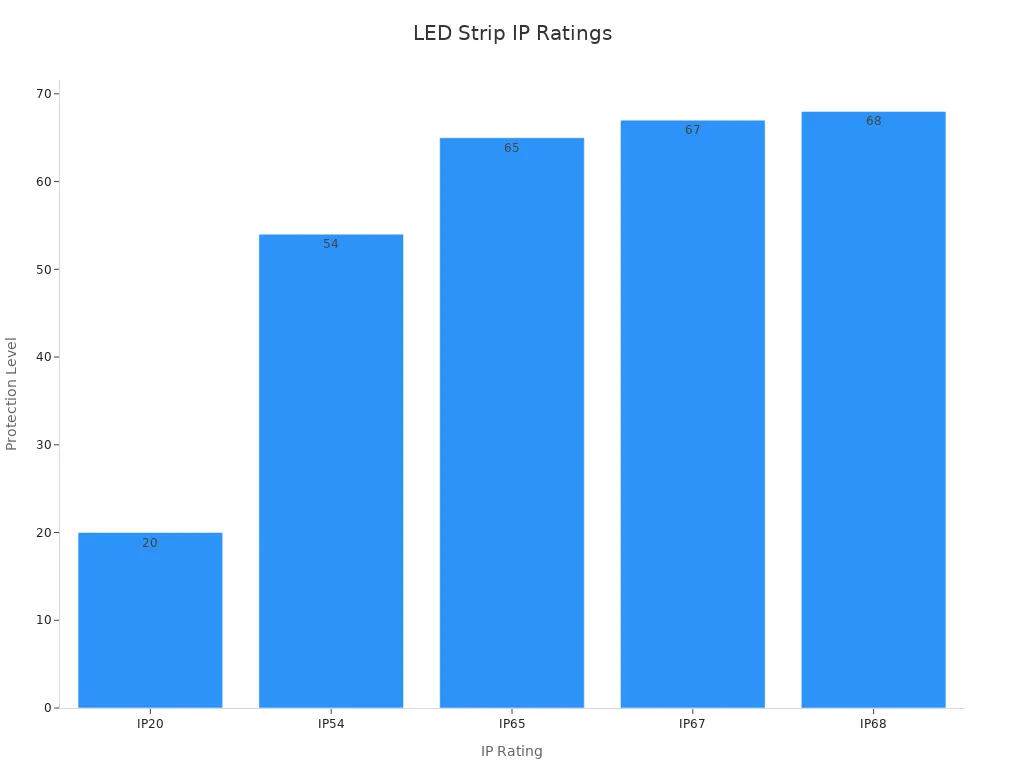
When picking RGB LED strip waterproof lights, know about IP ratings. These ratings show how well lights block dust and water. Higher IP ratings mean better protection for outdoor use. For example, IP65-rated lights resist water sprays, while IP68-rated lights can stay underwater, perfect for pools or fountains.
Here’s a simple guide to common IP ratings and their uses:
IP Rating | Description | Best Uses |
|---|---|---|
IP20 | Not waterproof, blocks large objects | Indoor dry areas |
IP65 | Resists water sprays from all sides | Outdoor areas, not underwater |
IP67 | Handles brief water dips | Outdoor spaces with light water exposure |
IP68 | Fully waterproof, stays underwater | Pools, fountains, or wet outdoor spots |
Tip: Always check the IP rating before buying waterproof LED strips. This ensures they fit your needs.
Pick Weatherproof Lights for Outside Use
For outdoor LED strips, check how they are waterproofed. Different methods give different levels of safety. For example, IP62 lights have a silicone layer to block dust and light water. IP68 lights use silicone sleeves and filling for full underwater safety.
Waterproofing Method | IP Rating | Description | Best Uses |
|---|---|---|---|
IP62 Silicone Coating | IP62 | Adds a silicone layer to block dust and water. | Dry or slightly wet places |
IP65 Heat Shrink Tube | IP65 | Covers the strip with a tube for water safety. | Wet areas, not for heavy outdoor use |
IP65 Silicone Sleeve | IP65 | Covers the strip with a silicone case. | Wet areas, not for heavy outdoor use |
IP67 Silicone Sleeve + Coating | IP67 | Combines a case and coating for water safety. | Areas with water splashes, not underwater |
IP68 Silicone Sleeve + Injection | IP68 | Fills a case with silicone for underwater use. | Perfect for pools or underwater lighting |
Note: For outdoor use, pick IP65 or higher. Near water, choose IP67 or IP68-rated lights.
By knowing IP ratings and waterproofing methods, you can easily pick the best RGB LED strip waterproof lights for your outdoor area.
Gather Tools and Materials for Installation
Tools Needed for Outdoor LED Strip Lights
Get the right tools before you start installing your lights. This makes the job easier and ensures everything looks neat. Here’s what you’ll need:
Measuring tape: Measure the area to avoid cutting strips wrong.
Scissors or utility knife: Cut strips to fit the space perfectly.
Screwdriver: Use it to tighten screws for brackets or connections.
Drill: Make holes for brackets or cable entry points.
Heat gun: Shrink heat tubes to seal and protect connections.
Multimeter: Check electrical connections to keep them safe.
Tip: Keep tools nearby to save time and avoid delays.
Materials for Waterproofing and Strength
Choose good materials to protect your lights from weather damage. Below is a table showing useful materials and their purposes:
Tool/Material | Purpose/Use |
|---|---|
Clear silicone | Adds waterproofing along edges before attaching the lights. |
Waterproof adhesives | Secures end caps with strong silicone or polyurethane glue. |
Waterproof grommets | Seals cable entry points to stop water from getting in. |
Marine-grade aluminium | Resists rust in wet or humid places. |
Anodised aluminium | Protects better against rust than regular aluminium. |
These materials help keep your lights safe and last longer. For example, marine-grade aluminium is great for rainy areas because it doesn’t rust. Waterproof grommets block water from damaging cables and connections.
Note: Pick high-quality materials to make sure your lights survive bad weather.
Get the Area Ready for Installation
Clean and Dry Surfaces for Better Stickiness
Before putting up outdoor LED strip lights, clean the area well. Dirt, grease, or water can make the lights fall off later. Use a damp cloth to wipe away dust, then dry it with another cloth. For tough stains, use mild soap and water, but make sure the surface is fully dry before starting.
Check for water damage or sun exposure on the surface. Areas facing south or west often get strong sunlight, which can weaken stickiness. If the surface looks worn out, use special caulks or primers to make it stronger. In shady spots that stay wet longer, give extra time for drying to ensure a good hold.
Tip: Install your lights during mild weather, like in spring or autumn. Avoid very hot or cold days, as they can affect how well the lights stick.
Preparing the area properly helps your waterproof LED strip lights stay in place, even in tough weather.
Test Waterproof LED Strip Lights First
Always test your LED strips before installing them to avoid problems. Connect them to the power source and check if they work. Make sure the brightness and colours are even across the strip. If you see flickering or dim parts, fix the issue before attaching the lights.
Test the strips where you plan to install them. This helps you spot issues like uneven surfaces or objects blocking the light. For waterproof LED strips, check that the seals and coatings are not damaged. A broken seal can let water in and ruin the lights.
Note: Testing also ensures your power supply and controller work well with the LED strips.
By testing carefully, you save time and effort. This step is key to making your lights last long and look great.
Install the LED Strip Lights
Attach the Strips Firmly to Outdoor Surfaces
Stick LED strips securely so they stay put outside. Use strong tape like 3M VHB double-sided tape. This tape sticks well and lasts long, even in tough weather. Press the tape evenly on the back of the strip and push it firmly onto the surface.
For bumpy or rough surfaces, use mounting clips or brackets. These hold the strips better and stop them from peeling off. Place the brackets evenly to spread the weight. If you need to drill, make sure the holes are clean and dry before adding screws.
Don’t stick strips directly on surfaces with too much heat or moisture. Instead, use waterproof glue or silicone sealant for extra hold. This keeps the strips in place during rain or humid weather.
Tip: Clean and dry the surface before sticking the strips. Dirt or grease can make the tape weak, causing the lights to fall off.
Manage Corners and Curves Easily
Corners and curves need careful planning when installing LED strips. Cut the strips only at marked spots to keep the circuit working. These marks are spaced evenly, so you can adjust the length without breaking the lights.
To join strips around corners, use cable connectors. These keep the circuit complete and fit the strip type. Pick connectors that match your strip’s width for a snug fit.
Soldering is another way to connect strips strongly. Heat the ends and join them carefully for a solid link. This method works well but needs precision.
When bending strips, don’t use too much force to avoid damaging the waterproof layer. Use glue to hold bends in place and check the polarity when connecting strips. For tight curves, flexible connectors work best to prevent harm.
Technique | Description |
|---|---|
Soldering the light strips | A strong method using heat to join strips securely. |
Using a cable connector | Connects two strips while keeping the circuit intact. |
Tips for mounting | Use glue for bends, connectors to avoid damage, and check polarity. |
Avoid bending waterproof strips | Too much bending can harm the waterproof layer; use connectors instead. |
Make cuts along cut marks | Cutting at marked spots avoids breaking the circuit. |
Choose the right connector | Ensure the connector fits the strip width properly. |
Note: Plan your layout to reduce cuts and joins. Fewer connections mean fewer problems and a smoother look.
By following these steps, you can handle corners and curves easily while keeping your LED strip lights in great shape.
Connect to the Power Source
Use Safe Wiring Techniques for Outdoor LED Strip Lights
Safety is key when wiring outdoor LED strip lights. Wires outside face moisture, dust, and temperature changes. These can cause problems if not handled well. Use wires made for outdoor use. They are stronger and resist damage from weather.
Keep wires tidy and secure. Attach them with cable clips to walls or surfaces. This stops tangling and keeps them safe. Don’t place wires where people walk often. If you must, cover them with protective conduits.
For connections, use waterproof connectors or heat-shrink tubing. These seal wires tightly and keep water out. Silicone coatings add extra protection by blocking moisture. Check wire polarity before connecting to power. Wrong polarity can harm the LED strips.
Tip: Test your wiring with a multimeter before turning on the lights. This ensures safe and correct connections.
Ensure Stable and Weatherproof Connections
Strong and weatherproof connections help your LED lights last longer. Rain, snow, and sunlight can damage your setup. Seal all cables and connectors properly to avoid this. Use silicone coatings and UV-resistant materials for extra safety.
Pick a power supply rated IP65 or higher for outdoor use. This protects it from water and dust. Place the power supply in a weatherproof box for added safety. Seal cable entry points with grommets to block water.
Note: Check your connections often for damage or wear. Fix problems early to prevent bigger issues later.
Follow these tips to keep your outdoor LED strip lights working well, even in bad weather.
Weatherproof the Setup
Seal Connections to Keep Out Moisture
Protecting connections from moisture is key to making your outdoor LED strip lights last longer. Water can sneak into open connections, causing damage or short circuits. To stop this, use proven sealing methods for outdoor setups.
Add waterproof silicone to the ends of the LED strips. This blocks water from reaching the electrical parts.
Make sure the area has good drainage. Pooled water near connections can still cause problems, even with seals.
For extra safety, try silicone foam or closed-cell silicone sponge gaskets. These materials keep out water and dust while staying flexible. Silicone foam works well in different temperatures, making it great for outdoor use. Closed-cell silicone sponge comes in various sizes and fits tightly to seal connections in tough conditions.
Another option is conformal coating. This thin waterproof layer protects LED parts from water and dampness. It’s especially helpful in rainy or humid areas. Always check the IP rating of your LED strips to ensure they’re suitable. For most outdoor uses, an IP65 rating is enough to block water sprays and dust.
Tip: Check your seals and connections often for wear or damage. Fixing small issues early can save you from bigger problems later.
Protect the Power Supply and Controller
Keeping the power supply and controller safe is important for a reliable outdoor LED system. These parts can be harmed by rain, snow, or extreme weather. Follow these steps to protect them:
Choose a power supply with at least an IP65 rating. This ensures it can handle water and dust exposure.
Put the power supply and controller in a weatherproof box. This gives extra protection from bad weather.
Seal cable entry points with waterproof grommets. These stop water from getting inside and damaging the parts.
Regular checks are also important. Inspect every three months to find and fix issues like burnt wires or short circuits. Backup power options, like batteries or generators, can keep your lights running during outages. For extra safety, add grounding and lightning protection to guard against electrical surges.
Protective Measure | Description |
|---|---|
Backup Power Systems | Use batteries or generators to keep lights on during outages. |
Environmental Protection Measures | Solar power is a reliable and eco-friendly option. |
Regular Inspection and Maintenance | Check power lines every three months to catch problems early. |
Quality Power Supply Selection | Pick power supplies with features like short circuit protection. |
Grounding Protection | Add grounding and lightning protection to avoid electrical damage. |
Note: Always pick high-quality parts for your outdoor LED setup. Spending more upfront can save you money by preventing failures and extending the life of your lights.
By sealing connections and protecting the power supply, you can make your outdoor LED strip lights last longer. These steps help your lights stay bright and work well, even in bad weather.
Test the Installation
Check If Lights Work and Shine Bright
Testing your LED strip lights makes sure they work properly. First, connect them to the power source. Look to see if they light up evenly. Flickering or dim spots might mean a problem with the power or connections.
Do an Electrical Performance Test to check current and power use. Use a multimeter to see if the voltage matches the LED strip’s needs. This step helps avoid overloading the circuit and keeps the lights working well.
Test the brightness and colour with a Luminous Efficiency Performance Test. This checks how bright the lights are and how colours look. For outdoor spaces, brighter lights improve visibility and make the area look better.
Criteria | Description |
|---|---|
Brightness | Brighter lights help you see better outside. |
Colour Temperature | Different colours create different moods. |
Power Supply | Voltage and wattage must match the LED strip’s needs. |
Tip: Test the lights where you plan to install them. This helps spot shadows or uneven lighting caused by objects nearby.
Fix Any Problems You Find
If something doesn’t work during testing, fix it quickly. Common problems include flickering, dim lights, or parts not lighting up. These issues often happen because of loose wires, low voltage, or wrong parts.
Here’s how to solve these problems:
Check all connections to make sure they’re tight. Loose wires can stop the circuit from working.
Make sure the power supply matches the LED strip’s voltage and current needs. Use a multimeter to double-check.
Look for damage like broken seals or exposed wires. Fix or replace damaged parts right away.
If lights flicker or dim, the power supply might be overloaded. Use more than one driver to share the power evenly.
Problem | Reason | Fix |
|---|---|---|
Flickering lights | Wrong power supply | Use a power supply with the right voltage and wattage. |
Dim sections | Voltage drop | Add more drivers to spread power evenly. |
Lights not turning on | Loose wires or bad power supply | Tighten wires or replace the power supply. |
Note: Check your setup often for damage or wear. Finding problems early can save you money and time later.
By testing and fixing issues, your LED strip lights will work well and look great. These steps help you create a strong and beautiful outdoor lighting setup.
Maintain Your Waterproof LED Strip Lights
Keep Lights Clean and Check Often
Cleaning your waterproof LED strip lights keeps them bright and working well. Dust and dirt can block light and cause overheating. Wipe them with a soft cloth or mild cleaner to remove dirt. Don’t use strong chemicals as they can harm the waterproof layer.
Check the power supply and circuits every month. Look for loose wires or worn parts to fix them early. A good cleaning and repair plan helps your lights last longer. Focus on sticky areas, as dirt can make adhesives weak over time.
Tip: Clean your lights when it’s cooler outside. Heat can weaken the adhesive.
Protect Lights from Weather
Rain, snow, and heat can damage outdoor LED strip lights. Keep them clean to stop dust from causing overheating. Overheating can shorten their life, so cleaning is very important.
Use dimmers to lower brightness and reduce wear on parts. Check the sticky backing often. If it’s coming off, use strong glue to stick it back firmly.
Note: Keeping lights clean and controlling heat makes them last longer and stay bright.
Follow these steps to keep your waterproof LED strip lights working well for many years.
Troubleshoot Common Problems
Fix Flickering or Dim Lights
Flickering or dim lights can spoil your outdoor lighting. These problems often happen due to weak power, loose wires, or voltage drops. Follow these steps to fix them:
Check the power supply: Make sure it matches your LED strip’s voltage and wattage. Wrong power can cause uneven brightness or flickering.
Inspect connections: Loose wires stop electricity from flowing properly. Tighten all wires and use waterproof connectors for outdoor setups.
Solve voltage drops: Long strips may lose brightness at the far end. Add power injectors or split the strip into shorter pieces for even lighting.
Tip: Use a multimeter to check voltage along the strip. This helps find weak spots in the circuit.
Fixing these issues will make your LED lights shine brightly and work smoothly.
Resolve Adhesion Issues
Peeling LED strips can ruin your setup, especially outside. To fix this, make sure they stick well:
Clean the surface: Dirt and grease weaken the adhesive. Wipe the area with a damp cloth and dry it completely before sticking the strip.
Use stronger adhesives: Replace weak tape with tough options like 3M VHB tape or silicone glue. These work better on rough surfaces.
Add mounting clips: Clips or brackets give extra support. They stop peeling in places exposed to heat or moisture.
Note: Don’t stick strips directly on hot or wet surfaces. Use waterproof glue for better hold.
These steps will keep your LED strips firmly in place, even in tough outdoor conditions.
Setting up and caring for outdoor waterproof LED strip lights helps them last longer and work well.
Learn about IP ratings to pick lights that suit your area.
Clean and dry surfaces before sticking the lights for a stronger hold.
Wipe the lights regularly with a damp cloth and gentle soap to stop dust from building up.
Check wires and connections often to keep water and damage away.
These simple steps make your outdoor lighting strong and beautiful.
FAQ
How do you choose the right power supply for LED strip lights?
Select a power supply that matches the voltage and wattage of your LED strip lights. Ensure it has an IP65 rating for outdoor use.
Can you use indoor strip lights outdoors?
Indoor strip lights lack waterproofing. Use waterproof LED strips with an IP65 or higher rating for outdoor installations to prevent damage from moisture and weather.
Are colour-changing LED strips suitable for outdoor use?
Yes, colour-changing LED strips work well outdoors. Ensure they have a waterproof rating of IP65 or higher and use a compatible controller for smooth operation.
See Also
Safe Ways to Utilise LED Strips in Outdoor Spaces
Effective Methods for Installing RGB LED Strip Lights
Ultimate Guide for Using LED Light Strips Outdoors


